Quick Answer
A record player can spin perfectly and still give you silence, hum, thin sound, or skipping. Most first-day problems aren't mysterious. They're setup problems: the wrong signal path, bad placement, or tonearm settings that never got dialed in.
Here's the simple rule: your turntable needs the right chain, a stable surface, and basic tonearm setup if the model requires it. For most beginners, the easiest path is a deck with a built-in phono preamp connected to powered speakers. If you're using passive speakers, you'll also need a receiver or amplifier in the middle.
The three beginner setups that make the most sense are simple. A turntable with a built-in preamp can go straight to powered speakers. A turntable without a preamp can go to a receiver with a phono input, then out to passive speakers. An all-in-one record player is the fastest route to hearing a record, but it usually gives up sound quality and upgrade room.
If you need quick picks, start here: the Audio-Technica AT-LP70XBT is the best overall for easy setup and flexibility, the Audio-Technica AT-LP60X-BK is the best budget buy, the Fluance RT85 is the premium pick for people ready to learn more, and the Fluance RT82 is the best value if you want a better long-term path.
Beginner system map
| Setup type | What you need | Best for | Main catch |
|---|---|---|---|
| Built-in preamp turntable | Turntable, powered speakers, RCA cable | Fast first setup, small rooms, no receiver | Sound ceiling depends heavily on the speakers |
| Turntable without preamp | Turntable, phono preamp or receiver with phono input, passive speakers or amp chain | Better upgrade path, existing stereo systems | More boxes, more wiring, more places to make a mistake |
| All-in-one record player | One unit, power outlet, records | Casual use, lowest setup friction | Weaker speakers, limited cartridge quality, poor upgrade options |
Do I need a preamp?
Yes, if your turntable outputs a phono-level signal and your speakers or amp don't have a phono stage.
No, if your turntable has a built-in preamp switched to Line, or your receiver has a phono input.
Here's a real-world example: someone unboxes an Audio-Technica deck, runs RCA cables straight into passive bookshelf speakers, and gets nothing. The turntable isn't broken. The chain is missing amplification. That's the kind of mistake this setup-first approach helps you avoid.
If you already have a turntable in mind, the quick picks below make it easier to match it with the right setup path.
Quick Recommendations
| Product | Rating | Best For | Key Benefit | CTA |
|---|---|---|---|---|
| Audio-Technica AT-LP70XBT | 9.3/10 | Best overall beginner setup | Easy setup, built-in preamp, wired and Bluetooth flexibility | Check the Price on Amazon! |
| Audio-Technica AT-LP60X-BK | 9.0/10 | Budget first setup | Fully automatic, low-friction setup | Check the Price on Amazon! |
| Fluance RT85 | 8.9/10 | Premium setup | Better upgrade ceiling, stronger component quality | Check the Price on Amazon! |
| Fluance RT82 | 9.1/10 | Best value | Better long-term path than many cheap all-in-ones | Check the Price on Amazon! |
| Victrola Navigator Bluetooth Record Player | 7.0/10 | Ultra-simple all-in-one use | Fastest path to first sound | Check the Price on Amazon! |
| Cotsoco Vinyl Record Player | 6.4/10 | Lowest-cost casual use | Cheap entry point, minimal setup | Check the Price on Amazon! |
Easy to set up doesn't always mean best sounding. The Audio-Technica models include built-in phono preamps, which cuts down on extra gear. The Fluance tables need more support around them, but they give you a better platform if you plan to keep building. The Victrola and Cotsoco all-in-one players reduce setup steps, but they cap sound quality and upgrade options fast.
If you have a $250 total budget and no receiver, you don't need a passive-speaker rabbit hole. You need a built-in-preamp turntable and a decent pair of powered speakers. That's why this table favors system fit, not just sticker price.
Once the shortlist is clear, the next step is understanding why these picks are easier or harder to live with after unboxing.
What We Recommend
Audio-Technica AT-LP70XBT, best overall
The AT-LP70XBT gets the nod because it removes the biggest beginner failure points without trapping you in an all-in-one box. It has a built-in phono preamp, so you can run it into powered speakers right away, and Bluetooth is there if you want convenience later. For most people, that's the cleanest first system.
A common apartment setup makes the case. You want records playing tonight, you don't want a receiver rack, and your shelf space is tight. Pair this with powered speakers and you're listening in one evening, not decoding a wiring diagram.
What We Noticed
This is the kind of deck that lowers friction in the right places. The signal path is simple, the setup labeling is clearer than on a lot of cheap competitors, and it doesn't ask a new owner to learn counterweight setup on day one.
Unexpected Pros
Bluetooth is useful, just not in the way marketing usually frames it. It's best as a backup convenience feature for casual listening, not your first troubleshooting path. Wired first, wireless later, that's the smart order.
Unexpected Cons
Bluetooth on the box can tempt people to skip the basic wired test. That's a mistake. If something sounds off, you want to isolate the turntable from the wireless link before blaming the cartridge or speakers.
Things Nobody Talks About
Convenience isn't only about automation. It's also about clear switches and predictable outputs. A switchable Line path saves a lot of beginner confusion, especially if you later move from powered speakers to a receiver.
Real-World Considerations
If you share furniture, live with pets, or keep your setup on a media console instead of a dedicated stand, this model makes sense. It keeps the chain short and the troubleshooting manageable. For many readers, that's worth more than chasing a more manual deck too early.
Audio-Technica AT-LP60X-BK, best budget
The AT-LP60X-BK is still one of the easiest low-cost ways to get a proper starter system going. It's fully automatic, has a built-in preamp, and works especially well with powered speakers. For a first setup, less tweakability can actually be a strength.
Think about the buyer who wants to play a stack of used soul LPs from the shop, not spend Saturday learning tonearm geometry. This table is built for that person. You plug it in, connect speakers, and get on with listening.
What We Noticed
The biggest win here is mistake reduction. Fully automatic operation means fewer clumsy cueing moments and fewer chances to mishandle the stylus in the first week.
Unexpected Pros
Its limitations keep some beginners out of trouble. You won't be tempted into endless adjustments because there aren't many to make. That can be a relief if your goal is music, not tinkering.
Unexpected Cons
The upgrade ceiling is lower than on something like a Fluance RT82. If you already know you'll want to swap cartridges, fine-tune tracking force, and build a bigger system, this may feel like a short stop instead of a long home.
Things Nobody Talks About
A lot of people compare this to suitcase players because the prices can get close. That's the wrong comparison. This is simple because it trims setup friction. A cheap all-in-one is simple because it trims performance and parts quality.
Real-World Considerations
For dorm rooms, bedrooms, and modest living room setups, this one still makes sense. Add a pair of powered speakers and you've got a clean, compact starter rig that won't punish you for being new.
Fluance RT85, premium pick
The RT85 is for the buyer who wants a better table and is willing to do a little homework. It offers stronger materials, a better cartridge platform, and more long-term system potential than the entry-level automatic crowd. It isn't the fastest first-spin option, but it can be the smarter long-term buy.
Picture someone with a growing jazz shelf, a decent receiver, and the patience to set tracking force and anti-skate correctly. That's the RT85 buyer. This isn't plug-and-forget. It's learn once, benefit for years.
What We Noticed
The jump in component quality is real. This kind of table rewards better speakers and a better phono stage in a way cheaper beginner decks usually can't.
Unexpected Pros
Manual setup teaches you the right lessons early. Once you understand how to balance a tonearm and set tracking force properly, future upgrades stop feeling intimidating.
Unexpected Cons
It asks more from you on day one. If your idea of a good first night is instant playback, this can feel like work. If your idea of a good first night is building a system carefully, it feels satisfying.
Things Nobody Talks About
A premium deck doesn't automatically fix a weak system around it. Put this into bad speakers on a shaky shelf and you'll still get disappointing results. Better hardware still needs a sane setup.
Real-World Considerations
This is best for buyers who already own decent supporting gear or plan to buy it soon. If your budget only covers the turntable and nothing else, your money may be better spread across the whole chain.
Fluance RT82, best value
The RT82 hits a sweet spot that a lot of beginners miss. It's a better long-term path than many flashy low-cost players, but it doesn't push as far into premium pricing as the RT85. If you want to start simple and improve later, this is the value pick.
A realistic path looks like this: buy the RT82 now, use a solid phono stage or receiver you already own, then upgrade speakers later. That staged build makes more sense than blowing the whole budget on a prettier but weaker all-in-one.
What We Noticed
This table feels like a bridge between beginner gear and enthusiast gear. It asks for more setup involvement than the Audio-Technica automatics, but it gives more back if you stick with the hobby.
Unexpected Pros
It avoids the dead-end feeling that some entry decks create. You can improve the system around it without immediately feeling like the turntable itself is the bottleneck.
Unexpected Cons
It isn't as forgiving for someone who wants zero learning curve. If you don't want to think about preamps, receivers, or tonearm settings at all, this won't be the easiest first date.
Things Nobody Talks About
Value in vinyl gear isn't just low price. It's how long the piece stays useful as the rest of your setup improves. That's where the RT82 earns its place.
Real-World Considerations
This is a strong fit if you already own a receiver, inherited one, or plan to build in stages. It gives you room to grow without forcing premium spending upfront.
Before we get into the full reviews, it helps to see how these picks were judged in setup terms, not just spec-sheet terms.
How We Chose
Criteria we weighted most
We scored these tables on first-day success, not just on how nice they look in a product listing. Setup difficulty mattered. Built-in preamp support mattered. Speaker matching flexibility mattered. Tonearm complexity, upgrade path, and common beginner failure points mattered too.
What this means in practice:
- A turntable with a switchable phono preamp scored better for beginners than one with vague output labeling.
- A model that works cleanly with powered speakers got extra credit because it reduces system cost and confusion.
- A flashy all-in-one lost points if convenience came with weak sound, poor durability, or a ceramic cartridge setup that limits record care.
Sources and evidence
This guide is built from installer logic, manufacturer documentation, and the support issues that show up over and over in Amazon reviews, Reddit threads, and audio forums. We also looked at how brands like Audio-Technica, Fluance, Victrola, Pro-Ject, and Rega position their products across beginner and budget categories.
What this means in practice:
- If two decks look similar on paper, the one with clearer setup instructions and more predictable outputs gets the edge.
- If buyers repeatedly report hum, weak labeling, or confusing switches, that affects the score.
- If a product is marketed as beginner-friendly but creates avoidable setup mistakes, we don't give it a free pass.
Methodology for beginner setup scoring
The core question was simple: how likely is a new owner to get music out of this thing on day one, without damaging records or buying surprise gear later? We rewarded clear controls, predictable wiring, and honest feature sets. We penalized false convenience.
What this means in practice:
- A built-in preamp with a proper Line setting helps more than a vague "preamp included" bullet on a box.
- A manual deck can still score well if it offers a strong long-term path and doesn't hide setup requirements.
- An all-in-one can make the list, but only as a compromise option, not as the default best choice.
Two turntables can look nearly identical in a comparison grid. If one has a switchable preamp and clearer rear-panel labeling, that can be the difference between music in ten minutes and an evening spent searching Reddit for "turntable no sound."
The next section gets into what actually changes your setup experience, and what's mostly marketing noise.
What Actually Matters
Worth paying for
For a first system, a built-in phono preamp is worth real money. So is switchable Line/Phono output, because it gives you flexibility now and later. Stable platters, decent isolation feet, a replaceable stylus, and a clear cue lever also matter more than beginners usually expect.
A simple example: you buy a turntable with a built-in preamp, connect it to powered speakers, and it works. Six months later, you move to a receiver with a phono input. A switchable output lets the same table fit both systems without drama.
What We Noticed
Most first-day wins come from boring features done well. Good feet, clear switches, and a replaceable moving magnet stylus beat decorative extras every time.
Overrated for first setups
Bluetooth is fine, but it shouldn't be the main reason you buy. Decorative suitcase styling is usually a distraction. Built-in speakers are convenient, but they're rarely satisfying for more than casual background listening.
A buyer can spend extra for wireless output, then place the deck on the same shaky cube shelf as the speakers and wonder why it skips. The Bluetooth feature worked exactly as promised. The setup around it didn't.
Unexpected Pros
Auto-stop on a beginner deck is more useful than a lot of premium-sounding marketing copy. It protects the stylus from endless runout groove spinning and makes casual listening easier.
Unexpected Cons
Feature overload can confuse new owners fast. More buttons and more modes don't help if the signal chain still isn't clear.
Gimmicks and confusion points
"Preamp included" is one of the most abused phrases in this category. It often doesn't explain whether the table is outputting phono or line level, or whether a switch needs to be flipped. Cheap ceramic cartridge systems also get sold as plug-and-play upgrades when they're really just cost-cutting shortcuts.
Things Nobody Talks About
A lot of beginner frustration comes from one tiny switch. Leave a Line/Phono selector in the wrong position and you'll either get very low volume or ugly distortion. That's not a subtle audiophile issue. That's a basic setup issue.
Do I need a preamp?
Yes if:
- Your turntable outputs a phono signal
- Your powered speakers, amp, or receiver don't have a phono stage
No if:
- Your turntable has a built-in preamp switched to Line
- Your receiver has a dedicated phono input
Powered speakers vs passive speakers for first setups
Powered speakers are usually the better first move. They have amplification built in, use fewer boxes, and are easier to troubleshoot.
Passive speakers can sound bigger and scale better, but they need a receiver or amp. If you forget to budget for that middle piece, the "deal" on passive bookshelves stops looking like a deal.
Real-World Considerations
Apartment listening changes the math. So do kids, pets, shared furniture, and tight budgets. In those situations, a shorter signal chain and a stable shelf matter more than fancy specs. A modest turntable on a solid stand with the right speakers will beat a more expensive setup that's wobbling next to a subpar all-in-one.
Once you know what matters, the common setup mistakes are much easier to avoid.
Common Mistakes Buyers Make
Buying a turntable before checking whether your speakers are powered, passive, or missing entirely
A turntable isn't a full system. If the speakers can't amplify the signal, you'll get silence.
Assuming a built-in preamp and a phono input are the same thing
Built-in preamp means the turntable can send line-level output. Phono input means the amplifier handles that job instead.
Skipping the ground wire and then blaming the turntable for hum
A missing ground connection can sound like a broken deck when it's really a five-second fix.
Placing the turntable on a wobbly shelf or the same surface as the speakers
If the furniture moves, the stylus hears it.
Forgetting to remove stylus guards, transport locks, or twist ties before first play
A lot of "defective" turntables are still half-packed.
Using Bluetooth for convenience before confirming the table works properly over a wired connection
Wire it first, prove the table works, then add convenience.
Setting tracking force by guesswork instead of following the cartridge or manufacturer range
Guesswork at the tonearm can cost more than the turntable if it damages records.
Choosing the cheapest all-in-one player when the real need is a simple powered-speaker setup
Most people shopping for an all-in-one really want fewer boxes, not lower quality.
Buying passive speakers without budgeting for a receiver or amp
Passive speakers are only half the purchase.
Starting with upgrade talk before getting the basic signal chain right
No mat, cable, or stylus upgrade fixes a broken setup path.
Which Product Is Right For You?
This is the plain-English version of the decision tree. Don't shop for the "best" deck in a vacuum. Shop for the setup path you can actually support on day one.
If you want the fastest first setup
Go with a turntable that has a built-in phono preamp, then pair it with powered speakers. That's the cleanest route from unboxing to first record because you skip the extra phono box and don't need a receiver.
Automatic or semi-automatic operation helps here too. If you're brand new, it's nice when the table handles start and stop without asking you to learn tonearm habits in the first ten minutes.
A realistic example: you live in an apartment, you don't own any stereo gear, and you just want to play Kind of Blue tonight without reading a forum for two hours. An Audio-Technica AT-LP60X-BK or Audio-Technica AT-LP70XBT plus a pair of powered speakers is the right kind of simple. If you want more speaker ideas, see our guide to speakers for turntables.
If you want the cleanest upgrade path
Look for switchable Line/Phono output. That one feature gives you room to start simple and improve later without replacing the whole deck.
You can begin with decent powered speakers, or use a receiver you already own, then add a better external phono preamp down the road if you catch the bug. Also prioritize a replaceable stylus and standard cartridge support, because those are the parts that keep a turntable from becoming a dead end.
A common scenario: you start with powered bookshelf speakers in a bedroom setup, then a year later move the table into a living room system. A model like the Fluance RT82 makes sense because it isn't built around shortcuts. If you're comparing growth-friendly options, our turntables under $1000 roundup is the next stop.
If you already own a stereo receiver with a phono input
Don't pay twice for the same function. If your receiver already has a working phono input, you don't need to spend extra just to get another built-in phono stage inside the turntable.
Check the back panel and confirm it actually says "Phono," not just "Aux," "CD," or "Line." Then make sure that phono stage still works cleanly, because older receivers can have noisy or tired inputs.
Here's the easy example: you inherited a Yamaha or Sony receiver from a family member, and it has a proper phono input. Instead of chasing extra features you won't use, put more of your budget into a better deck, a decent cartridge, and smarter speaker placement. That's a much better spend than duplicating electronics.
If you're shopping on a tight budget
Put your money into the turntable and speaker basics first. Skip weak built-in speakers, flashy suitcase styling, and anything that looks like it was designed more for Instagram than playback.
The Audio-Technica AT-LP60X-BK is the value path I trust most for true beginners because it's simple without being disposable. That's very different from a novelty player that's "easy" only because it cuts corners.
A real-world budget split might look like this: modest deck, entry powered speakers, stable shelf, record brush. That's smarter than blowing the whole budget on an all-in-one and then wondering why everything sounds small and boxy. If you need lower-cost options, check turntables under $100 and turntables under $100 dollars.
If you want room-filling sound
Passive speakers plus a receiver will beat most all-in-ones, and usually beat tiny powered setups too, especially in a larger room. But you have to budget for the whole chain, not just the deck.
That means turntable, amplification, speakers, cables, and a stand that doesn't wobble. In bigger rooms, placement and furniture stability matter more than people expect. A great table on a shaky console between two boomy speakers can still sound lousy.
Picture a medium-size living room with hardwood floors and open space into the kitchen. A compact all-in-one will disappear in there. A proper receiver with passive speakers on stands gives you scale, better separation, and less strain.
If you want convenience over fidelity
Bluetooth-capable turntables can absolutely work. Just don't make wireless your only plan.
Confirm the deck still offers wired output, because Bluetooth is best treated as a bonus feature, not the core signal path. Wired is easier to troubleshoot, easier to level-match, and usually sounds better too.
A good example is the Audio-Technica AT-LP70XBT. If you want to send music to a Bluetooth speaker in a small room, fine. But if something sounds off, you'll want the option to plug straight into powered speakers and rule out the wireless link. If you're weighing that tradeoff, read our Bluetooth turntables explained guide.
With the setup path sorted, the full product notes below show where each option fits in real use.
Product Reviews
These picks aren't here because they look good in a product grid. They're here because each one points to a different kind of first system, from low-friction beginner decks to compromise all-in-ones.
Audio-Technica AT-LP70XBT
Summary
The Audio-Technica AT-LP70XBT is the best overall fit for most first-time buyers who want an easy start without boxing themselves into a dead-end system. It keeps setup friendly, adds Bluetooth if you want it, and still works as a proper wired turntable.
Pros
- Built-in phono preamp keeps setup simple
- Bluetooth output adds convenience
- Easy compatibility with powered speakers
- More flexibility than bare-bones beginner decks
- Automatic operation lowers first-day friction
Cons
- Costs more than the cheapest starter options
- Bluetooth isn't necessary for every buyer
- Still isn't the best choice for people who want a fully manual hi-fi platform
Best For
Buyers who want the easiest good setup, not just the cheapest one.
Key Features
Fully automatic operation, built-in phono preamp, Bluetooth output, RCA wired output, moving magnet cartridge design, compact footprint.
What We Liked
This one gets the balance right. It doesn't ask much from a beginner, but it also doesn't feel like a toy or a short-term placeholder.
The shift from "I just want records to play" to "I want better speakers later" is where this model earns its keep. It gives you room to grow without making day-one setup annoying.
What Could Be Better
Bluetooth adds cost, and some buyers won't use it much after the first week. If you're always going wired, part of the premium goes toward convenience rather than sound.
Bottom Line
If you want one recommendation that works for the widest range of beginners, this is it. It's the easiest strong long-term bet in this group.
What We Noticed
The appeal here isn't one flashy feature. It's how little can go wrong when you connect it to powered speakers and start listening.
Unexpected Pros
Bluetooth can be handy in awkward rooms, especially if your speaker placement options are limited. That's not my favorite way to listen, but it's a real convenience win for some setups.
Unexpected Cons
Wireless features can tempt people to skip the wired test. That's backwards. Always prove the table works over RCA first.
Things Nobody Talks About
A turntable that's easy to explain is often better for beginners than one that's slightly better on paper. If you ever need to move apartments, swap speakers, or help someone else use it, simplicity matters.
Real-World Considerations
If your room is small, your budget is moderate, and you don't already own a receiver, this is a very clean first system anchor. Pair it with powered speakers and you're done.
Audio-Technica AT-LP60X-BK
Summary
The Audio-Technica AT-LP60X-BK is still one of the best low-cost ways to start playing records correctly. It's simple because it removes setup friction, not because it cuts every corner.
Pros
- Very easy first setup
- Built-in phono preamp
- Fully automatic operation
- Usually excellent value
- Better beginner choice than most cheap all-in-ones
Cons
- Limited upgrade flexibility
- Basic feature set
- Not for buyers who want to tweak tonearm settings
Best For
Tight budgets, first apartments, dorm rooms, and anyone who wants a no-fuss starter system.
Key Features
Fully automatic belt-drive design, built-in preamp, RCA output, compact chassis, beginner-friendly operation.
What We Liked
This deck has saved a lot of people from bad first purchases. If someone is about to buy a flimsy suitcase player, this is the model I'd point them toward instead.
It works especially well with powered speakers because the signal chain stays clean and obvious.
What Could Be Better
You don't get much tweakability. If you already know you want cartridge swaps, manual tonearm setup, and a more enthusiast-leaning platform, you'll outgrow it sooner.
Bottom Line
For buyers who need the simplest value path, the AT-LP60X-BK still makes a lot of sense. Beginner-friendly doesn't have to mean bad.
What We Noticed
The biggest win is confidence. You can get this table running without second-guessing every cable and switch.
Unexpected Pros
Automatic operation is underrated for casual listening. If you're spinning records while cooking or cleaning, auto-stop is a nice quality-of-life feature.
Unexpected Cons
People sometimes mistake "easy" for "upgradeable." This one is mostly about getting started cleanly, not building a forever system.
Things Nobody Talks About
A cheap turntable that behaves predictably is worth more than a flashy one with random quirks. Reliability is part of sound quality when you're new to the hobby.
Real-World Considerations
If you're choosing between this and a suitcase player at a similar price, they aren't equally beginner friendly. One removes friction. The other removes quality.
Fluance RT85
Summary
The Fluance RT85 is the premium pick here for buyers who are ready to learn a little more setup in exchange for a much stronger long-term platform. It isn't the easiest first deck, but it rewards care.
Pros
- Excellent long-term value
- Strong upgrade-friendly platform
- Better parts and finish than entry models
- Serious home listening deck
- Standard hi-fi path with real system-building potential
Cons
- More setup involvement
- Not the best fit for total beginners who want instant simplicity
- Needs the rest of the chain to match
Best For
Buyers who want a premium home listening setup and don't mind learning manual basics.
Key Features
Manual operation, higher-grade cartridge, solid plinth, upgrade-friendly design, standard hi-fi connectivity.
What We Liked
This is where the system starts to feel like a real hi-fi rig rather than a starter appliance. The RT85 makes sense if you care about the long game and you're willing to do setup properly.
What Could Be Better
It asks more from the owner. If you don't want to think about tracking force, placement, or matching gear, this can be more table than you need.
Bottom Line
Great premium choice, but only if your patience and supporting gear match the ambition.
What We Noticed
The RT85 doesn't flatter weak systems. Put it into a bad setup and you'll hear the weak link fast.
Unexpected Pros
Because it's a better platform, upgrades later actually feel worthwhile. Better speakers, a better phono stage, and better isolation all have room to show up here.
Unexpected Cons
Some buyers spend premium money on the deck, then starve the speaker budget. That's the wrong order.
Things Nobody Talks About
A nicer turntable can make setup discipline matter more, not less. Level surface, stable stand, and proper connection choices all count.
Real-World Considerations
If you're building a living room system and plan to keep it for years, the RT85 is a serious candidate. If you're in a dorm with a Bluetooth speaker, it isn't.
Fluance RT82
Summary
The Fluance RT82 is the value sweet spot for buyers who want a real upgrade path without jumping straight to premium pricing. It asks for a little more setup care, but it pays you back in flexibility.
Pros
- Strong price-to-performance balance
- Better long-term path than many beginner decks
- Standard cartridge support
- Good foundation for future upgrades
- More serious than entry automatic tables
Cons
- Less plug-and-play than built-in-preamp models
- Manual setup can intimidate first-timers
- Not the fastest route to first sound
Best For
Buyers who want value now and fewer regrets later.
Key Features
Manual belt-drive design, upgrade-friendly tonearm platform, standard cartridge compatibility, enthusiast-leaning layout.
What We Liked
This is the model for someone who wants to learn the basics once and then stop replacing gear every year. It sits in a smart middle ground.
What Could Be Better
It won't hold your hand the way an automatic Audio-Technica will. If ease is your top priority, this isn't the first pick.
Bottom Line
The RT82 is the value recommendation because it gives you real room to grow without demanding premium money upfront.
What We Noticed
The people happiest with this table usually know why they bought it. They wanted a platform, not just a quick fix.
Unexpected Pros
It pairs well with both modest and better systems. You don't need to max out the rest of your chain on day one.
Unexpected Cons
Manual setup anxiety is real for beginners. Some buyers would enjoy records more with a simpler automatic deck, even if the RT82 is better on paper.
Things Nobody Talks About
Upgrade path only matters if you plan to use it. Don't buy future potential you won't touch.
Real-World Considerations
If you already own a receiver, or plan to build a fuller passive-speaker system, this is one of the smartest value plays in the category.
Victrola Navigator Bluetooth Record Player
Summary
The Victrola Navigator Bluetooth Record Player is an all-in-one convenience buy. It gets sound out fast, but the compromises are real.
Pros
- Very low setup barrier
- Built-in speakers
- Bluetooth feature appeals to casual users
- Compact and giftable
Cons
- Limited speaker quality
- Weak upgrade path
- Build quality is mixed
- More style-led than system-led
Best For
Casual listeners who want a decorative, ultra-simple player and have modest expectations.
Key Features
All-in-one design, built-in speakers, Bluetooth capability, compact cabinet, simplified controls.
What We Liked
It does answer one real need: fewer boxes, less wiring, faster first sound.
What Could Be Better
Almost everything that matters after the first week. Speaker quality, long-term value, and flexibility all trail far behind a simple turntable plus powered speakers setup.
Bottom Line
Convenient, yes. Good first system, not really, unless your expectations are very casual.
What We Noticed
A lot of buyers confuse convenience with value. They aren't the same thing.
Unexpected Pros
For a guest room, occasional use, or someone who truly won't build a system, it can be enough.
Unexpected Cons
Once you hear even a basic external speaker setup, the limits become obvious fast.
Things Nobody Talks About
The all-in-one pitch works best when the buyer doesn't realize how little extra effort it takes to do better.
Real-World Considerations
If you're choosing this because you hate wiring, fair enough. But if you're choosing it because you think it's the smartest beginner audio buy, I'd push you toward a basic Audio-Technica and powered speakers instead.
Cotsoco Vinyl Record Player
Summary
The Cotsoco Vinyl Record Player sits in the cheap all-in-one lane. It's easy to buy, easy to gift, and hard to recommend over a better basic setup.
Pros
- Cheap entry price
- Built-in speakers
- Minimal setup
- Portable footprint
Cons
- Compromise sound
- Questionable long-term reliability
- Limited cartridge and stylus path
- Often a false economy
Best For
Buyers who care more about low upfront cost than sound quality or upgrade potential.
Key Features
All-in-one record player format, built-in speakers, compact body, beginner-facing controls.
What We Liked
It keeps the barrier to entry low. That's the honest appeal.
What Could Be Better
The better question is what it does better than a proper starter deck, and the answer is mostly price and convenience. That's not enough for me to call it a strong first-system choice.
Bottom Line
This is a compromise buy. It may be cheap, but it often isn't the cheapest path to satisfaction.
What We Noticed
These players often look friendlier than they sound. That's the trap.
Unexpected Pros
If someone just wants a novelty player for occasional spins, it can serve that narrow role.
Unexpected Cons
The money saved upfront can turn into a second purchase later, because many buyers outgrow this tier almost immediately.
Things Nobody Talks About
Cheap all-in-ones and true beginner decks aren't solving the same problem. One is chasing the lowest sticker price. The other is trying to make vinyl playback work well enough to keep.
Real-World Considerations
If you're comparing this to the AT-LP60X-BK, don't stop at "both are beginner models." One is a starter system. The other is a shortcut.
If you're down to two options, the direct comparisons below make the tradeoffs much easier to see.
Product Comparisons
More features don't automatically make a better first setup. The right choice depends on what you're connecting, where you're listening, and how much future tinkering you actually want.
Audio-Technica AT-LP60X-BK vs Audio-Technica AT-LP70XBT
| Feature | Audio-Technica AT-LP60X-BK | Audio-Technica AT-LP70XBT | Best for |
|---|---|---|---|
| Price | Lower | Higher | LP60X for tighter budgets |
| Setup ease | Very easy | Very easy | Tie |
| Automation | Fully automatic | Fully automatic | Tie |
| Bluetooth | No | Yes | LP70XBT for wireless convenience |
| Upgrade flexibility | Limited | Better | LP70XBT |
| Long-term value | Good for basics | Better overall | LP70XBT |
Choose the AT-LP60X-BK if budget and simplicity matter most. It's the cleaner answer for someone who just needs a reliable first system and doesn't want to overthink it.
Choose the AT-LP70XBT if you want more flexibility without adding much more setup friction. A reader in a small apartment might assume Bluetooth alone makes it the better buy. Sometimes it does, sometimes it doesn't. If your speakers will sit right next to the table anyway, that extra feature may not change your real use much.
Victrola Navigator Bluetooth Record Player vs Cotsoco Vinyl Record Player
| Feature | Victrola Navigator Bluetooth Record Player | Cotsoco Vinyl Record Player | Best for |
|---|---|---|---|
| All-in-one convenience | High | High | Tie |
| Speaker quality | Slightly better | Usually weaker | Victrola |
| Build quality | Mixed but more established | More variable | Victrola |
| Reliability expectations | Modest | Modest to low | Victrola |
| Long-term value | Limited | Very limited | Neither, for most buyers |
Between these two, the Victrola Navigator is the less risky pick. That's faint praise, but it's honest.
The bigger point is this: many people shopping these models should avoid both and buy a simple turntable plus powered speakers instead. You'll spend a little more, but you'll get a real stereo image, better record handling, and a system you won't want to replace right away.
Powered speakers vs passive speakers
| Feature | Powered speakers | Passive speakers | Best for |
|---|---|---|---|
| Cost of full setup | Lower upfront | Higher, because you need a receiver or amp | Powered speakers for beginners |
| Wiring complexity | Simpler | More involved | Powered speakers |
| Upgrade path | Moderate | Better | Passive speakers |
| Room size fit | Small to medium rooms | Medium to large rooms | Depends on room |
| Troubleshooting ease | Easier | More variables | Powered speakers |
Powered speakers are the best first external speaker path for most beginners. Fewer boxes means fewer failure points.
Passive speakers win if you want room-filling sound and long-term flexibility. But don't buy passive speakers by accident. They need amplification, and that's where a lot of first setups go sideways. For more help, see our full guide to speakers for turntables.
Built-in phono preamp vs external phono preamp
| Feature | Built-in phono preamp | External phono preamp | Best for |
|---|---|---|---|
| Simplicity | Very simple | More boxes and cables | Beginners |
| Flexibility | Good if switchable | Better | Tinkerers |
| Cost | Lower | Higher | Built-in |
| Sound quality potential | Solid for many starter systems | Higher ceiling | External |
| Setup risk | Lower | Higher | Built-in |
A built-in phono stage is usually the right answer for a first setup. It reduces confusion and gets you to music faster.
An external phono preamp makes sense once you know why you want one. If you want the full breakdown, read what is a phono preamp.
If none of the main picks match your room or budget, there are a few alternative setup paths worth considering.
Alternatives
Different rooms and different gear closets call for different system shapes. The trick is knowing which compromises you're making before you buy.
All-in-one record players for ultra-simple setups
This is the fastest path to first sound. Unbox it, plug it in, and you're basically there.
It's also the biggest compromise in speaker quality and upgrade path. These are best for casual use, gift buying, or someone who wants records as a light hobby, not a system-building hobby.
A realistic case: you want something for a spare room and you'll play a handful of records a month. Fine. Just don't confuse that use case with a good long-term home listening setup.
Powered bookshelf speaker systems
For most beginners, this is the sweet spot. A turntable with a built-in preamp plus powered bookshelf speakers gives you fewer boxes, easier troubleshooting, and much better sound than an all-in-one.
This path also keeps the signal chain obvious. Turntable out, speakers in, done. If something goes wrong, there are fewer places to hunt.
A common first system looks like this: Audio-Technica deck on a stable shelf, powered speakers on stands or isolation pads, wired RCA connection, and no receiver in the middle. That's a very sane place to start.
Stereo receiver plus passive speakers
This is the better route for room-filling sound and long-term flexibility. It also brings more wiring, more settings, and more chances to make a simple mistake.
If you already own part of the chain, though, it can be the smartest value move. Someone who inherits a working stereo receiver with a phono input doesn't need to duplicate gear with powered speakers and a built-in-preamp-first mindset. Build around what you already have.
This is also where placement matters more. Bigger speakers in a bigger room can sound excellent, but only if the stands, spacing, and furniture are sorted.
Bluetooth turntable systems
Bluetooth is useful for convenience, shared spaces, and rooms where wiring is awkward. It isn't the best first troubleshooting path.
Always confirm wired fallback. If the deck sounds strange over wireless, you need a clean way to test whether the issue is the turntable, the speaker, or the Bluetooth connection itself.
A small-bedroom setup makes sense here: you want to send audio to a Bluetooth speaker on the opposite side of the room. That's fine. Just don't skip the RCA test on day one.
Used vintage receiver with a phono input
This can be a smart value move, especially if the receiver is from Yamaha, Sony, Pioneer, or another mainstream brand with a healthy phono stage. But condition matters.
Check for noisy inputs, scratchy controls, channel imbalance, and obvious service neglect. A vintage receiver can be a bargain, or it can become your new repair hobby.
If you inherit one that's working well, that's a gift. Put more of your budget into the turntable itself and let the receiver do the amplification work.
Brand differences matter too, especially when you're trying to avoid setup headaches and dead-end upgrades.
Brand Guide
Brand reputation matters, but not in the lazy way people use it. The real question is what each company tends to optimize for: first-day ease, long-term growth, styling, or straight-up sound.
Audio-Technica
Audio-Technica has earned its place with beginner-friendly turntables that are easy to set up and easy to match with everyday gear. Compatibility is usually predictable, and that's a big deal for first-time buyers.
The tradeoff is that some entry models give up tweakability for simplicity. That's not a flaw if your goal is to get records playing correctly with minimal fuss. For this guide, the AT-LP60X-BK and AT-LP70XBT are the key examples. If you want more options, browse our main turntables hub.
Fluance
Fluance tends to offer better long-term platforms for the money. The appeal is value plus room to grow, especially with models like the RT82 and RT85.
The catch is that some Fluance decks ask more from the owner during setup. A buyer seeing Fluance and Audio-Technica in the same price neighborhood might assume they're interchangeable. They aren't. Audio-Technica often leans easier on day one, while Fluance often gives you more runway later.
Pro-Ject
Pro-Ject has real hi-fi credibility and a sound-first reputation. Entry Debut models can be excellent, but they aren't always the most forgiving first purchase for someone who wants plug-and-play ease.
If you're the kind of buyer who doesn't mind learning manual setup and cares about the listening payoff, Pro-Ject deserves a look. If you're overwhelmed by the idea of balancing a tonearm, maybe not yet.
Rega
Rega's entry Planar range has strong brand trust for a reason. These tables often sound lively and musically engaging, and the minimalist design appeals to people who want fewer gimmicks.
The downside is that they aren't always the easiest first setup for budget buyers. Rega makes more sense when you already know you're committed to the hobby and the rest of your system can keep up.
Victrola
Victrola is built around convenience and accessibility. That's why the brand shows up so often in gift shopping, dorm rooms, and casual first purchases.
Quality is mixed, and long-term value is limited on many all-in-one models. The Navigator Bluetooth Record Player fits that pattern: easy access, low setup barrier, modest ceiling.
Crosley
Crosley is one of those brands people love to overgeneralize about. That's a mistake.
The truth is quality varies heavily by model. Some are style-led and compromise-heavy. Others are more respectable than the internet gives them credit for. You still have to judge the actual product, not just the logo.
Sony
Sony's strength in this niche is mainstream convenience. The brand usually understands approachable features, and some Bluetooth-friendly options make sense for casual buyers.
What Sony doesn't always offer here is the strongest enthusiast path. If your goal is a simple, familiar consumer-audio experience, Sony can fit. If your goal is a long upgrade ladder, other brands may fit better.
U-Turn Audio
U-Turn Audio has a thoughtful reputation for simple, upgrade-aware turntables with clean design. The brand appeals to buyers who want something more intentional than a mass-market starter deck.
That said, setup can still be more manual than the easiest beginner tables from Audio-Technica. It's a good fit for buyers who want simplicity, but not necessarily automation.
Once the brands are clear, the feature terms on product pages make a lot more sense.
Materials and Features Guide
This is the vocabulary that keeps a first setup from going sideways. You don't need to become an engineer, but you do need to know what each part does and why it affects compatibility.
Core setup parts, mini table
| Part or feature | What it does | Why it matters in setup |
|---|---|---|
| Platter | The rotating surface that holds the record | Must be installed correctly on some models |
| Tonearm | Holds the cartridge and stylus over the record | Needs proper handling and setup |
| Stylus | The needle that reads the groove | Damage here means bad sound and record wear |
| Counterweight | Balances the tonearm and sets tracking force | Required on many manual decks |
| Anti-skate | Helps the tonearm track evenly across the record | Prevents uneven pull and poor playback |
| Ground wire | Reduces electrical hum in many setups | Often needed with receivers and phono stages |
Built-in phono preamp
A phono preamp boosts the tiny phono-level signal from a turntable up to line level. If it's built into the deck, setup gets much easier because you can connect straight to powered speakers or any standard line input.
For beginners, this is one of the most useful features you can buy. It removes a whole box from the chain. If you want the deeper explainer, see what is a phono preamp.
Switchable line/phono output
This is one of the best flexibility features for a first system. It lets one turntable work with powered speakers now, then with a separate phono stage or receiver later.
Here's the mistake it prevents: a beginner sees a Line/Phono switch, leaves it in the wrong position, and gets either weak volume or ugly distortion. If you're plugging into powered speakers or an AUX input, use Line. If you're plugging into a receiver's phono input, use Phono.
RCA outputs and ground terminal
RCA outputs carry the left and right audio channels. Red is right, white is left.
The ground terminal matters when you're using a receiver or external phono preamp that has a grounding point. If you skip the ground wire where one is needed, hum is the usual result.
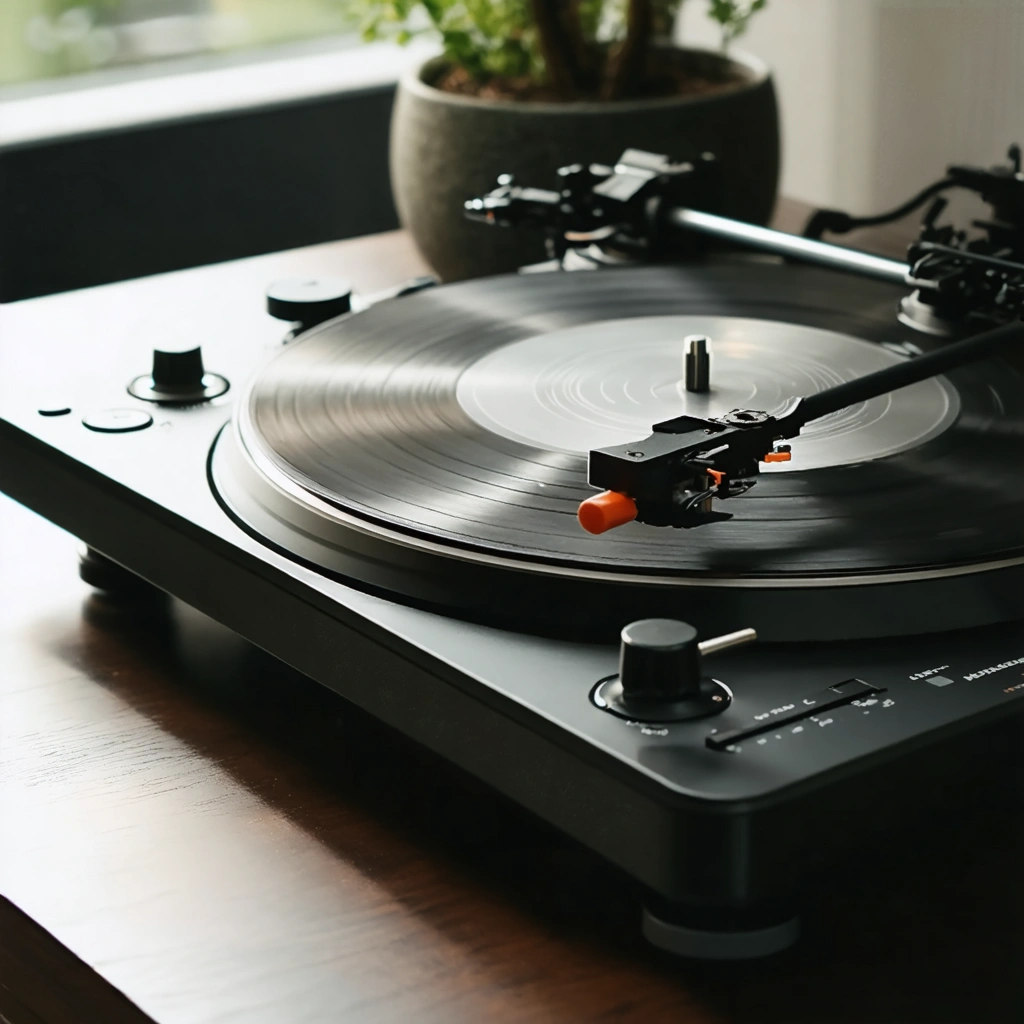
Counterweight and anti-skate dial
These aren't advanced tweaks for snobs. They're basic setup controls on manual decks.
The counterweight sets tracking force, which is how firmly the stylus sits in the groove. Anti-skate helps the tonearm resist inward pull. If those settings are wrong, you can get skipping, distortion, uneven channel balance, or unnecessary record wear.
Cue lever
The cue lever lowers and raises the stylus gently. That's safer than trying to hand-drop the needle, especially if you're new.
For beginners, this small feature matters more than flashy extras. It protects records and nerves.
Belt-drive motor vs direct-drive motor
A belt-drive turntable uses a belt to spin the platter. That's common in home listening setups because it keeps motor vibration a bit more isolated in many designs.
A direct-drive turntable spins the platter directly from the motor. It often offers strong speed stability and fast start-up. For this guide, the practical point is simple: belt-drive dominates beginner home systems, while direct-drive matters more if your use case goes beyond casual listening. If you want more context, our how to choose a turntable guide helps.
Moving magnet cartridge vs ceramic cartridge
A moving magnet cartridge is the better baseline for most serious beginner setups. It offers better sound quality, better stylus replacement options, and a more standard hi-fi path.
Cheap ceramic cartridge systems often show up in low-cost all-in-ones. That's one reason many of those players hit a ceiling fast.
Replaceable stylus
A replaceable stylus lowers long-term cost and makes record care easier. When the stylus wears out, you replace the tip instead of treating the whole player like a disposable object.
That's a big reason proper starter decks age better than novelty players. For record care basics, see how to protect your records.
Bluetooth output
Bluetooth is a convenience feature. It can be useful in small rooms or shared spaces, but it adds compression and another troubleshooting layer.
Treat wireless as optional. Test the table with a wired connection first, then add Bluetooth once you know the core setup works. For more on that tradeoff, read Bluetooth turntables explained.
Auto-stop and fully automatic operation
Auto-stop and full automation are good beginner features. They reduce handling mistakes and make casual listening easier.
They aren't the same thing as better sound. Convenience and fidelity aren't enemies, but they aren't synonyms either.
Manual operation
Manual tables ask more from you. You place the tonearm, you monitor the end of the side, and on many models you handle more of the setup yourself.
That extra involvement can be worth it if you want more control and a better long-term platform. It just isn't the easiest first step for everyone.
Platter mat and isolation feet
These parts help with stability and vibration control. They matter, but don't oversell them as miracle upgrades.
A platter mat and isolation feet can't rescue a bad shelf or a speaker sitting on the same shaky surface as the turntable. Start with placement first.
Connection paths that actually work
| Setup path | Exact signal chain | Best for | Common mistake |
|---|---|---|---|
| Turntable to phono preamp to receiver to passive speakers | Turntable → external phono preamp → receiver → passive speakers | Manual or upgrade-focused systems | Forgetting the ground wire |
| Turntable to receiver phono input to passive speakers | Turntable → receiver phono input → passive speakers | Buyers with a receiver that already has phono | Plugging into AUX instead of Phono |
| Turntable with built-in preamp to powered speakers | Turntable (Line out) → powered speakers | Most beginners | Leaving the switch on Phono |
| Bluetooth turntable to Bluetooth speaker | Turntable → Bluetooth speaker | Convenience-first setups | Skipping wired testing |
| All-in-one record player | Internal chain only | Ultra-casual use | Expecting real upgrade room |
First setup checklist
- Unbox and remove all transport materials.
- Place the turntable on a stable surface.
- Install the belt and platter if the model requires it.
- Connect RCA cables and the ground wire if needed.
- Set the preamp switch to Phono or Line correctly.
- Balance the tonearm and set tracking force if the model requires it.
- Set anti-skate to match tracking force when applicable.
- Test with a wired connection first.
- Play a clean record and confirm both channels work.
A quick scenario matters here: if you connect a built-in-preamp turntable to powered speakers and leave the switch on Phono, the sound will be weak and wrong. If you connect that same turntable to a receiver's phono input while the switch is on Line, the sound may be distorted and overloaded. One tiny switch can make a working setup seem broken.
Troubleshooting matrix
| Problem | Likely cause | First fix |
|---|---|---|
| No sound | Wrong input or wrong Line/Phono setting | Check speaker input and preamp switch |
| Hum | Missing ground wire or bad cable routing | Attach ground wire, reseat RCA cables |
| Skipping | Bad placement or wrong tracking force | Move table to stable surface, verify tonearm setup |
| One-channel audio | Loose RCA connection | Reseat left and right cables |
| Distorted playback | Wrong preamp path or worn stylus | Check signal chain, inspect stylus |
The FAQ below answers the exact setup questions people ask once the box is open and the cables are in hand.
Frequently Asked Questions
What is a record player setup guide?
A record player setup guide is a step-by-step walkthrough for getting a turntable playing correctly at home. It covers the signal chain, placement, speaker connection, phono preamp needs, and basic tonearm settings like tracking force and anti-skate.
For a beginner, that matters more than spec-sheet talk. A table can spin and still be set up wrong. The point of a good setup guide is simple: get clean sound on day one without damaging your records or chasing problems caused by one missed switch or cable.
What do you need to set up a record player at home?
You need five basics: the turntable, a way to amplify the signal, speakers, the right cables, and a stable surface. Depending on your gear, that middle step could be a built-in phono preamp, an external phono preamp, or a receiver with a phono input.
The most common first system is a turntable with a built-in preamp plus powered speakers. That's the easiest route because you skip the separate receiver. If your deck doesn't include RCA cables, add those to the cart. If it needs grounding, you'll also need the ground wire connected properly.
How do you connect a record player to speakers?
It depends on whether the speakers are powered or passive, and whether the turntable has a built-in phono preamp.
If the table has a built-in preamp, connect its RCA output to powered speakers or to any standard line input on a receiver or amp. If the table doesn't have one, connect it first to a phono preamp, then to powered speakers or a receiver. Passive speakers can't connect directly to most turntables, they need a receiver or amplifier in the chain.
A real-world example: someone buys passive bookshelf speakers because they look great on a shelf, then realizes there's nowhere to plug them into the turntable. That's not a speaker problem. It's a missing amp problem.
Do you need a phono preamp for every turntable?
No. You only need a phono preamp if your turntable doesn't have one built in and your receiver or speakers don't provide a phono stage.
Here's the quick rule: if your turntable has a Line/Phono switch, it probably has a built-in preamp. If your receiver has an input labeled Phono, it already has one. If neither is true, you need an external unit. If you want the longer breakdown, see what is a phono preamp.
How do you balance a tonearm and set tracking force?
First, with the stylus guard on, set anti-skate to zero if your turntable allows it. Then adjust the counterweight until the tonearm floats level, neither rising nor dropping. Once it's balanced, set the tracking force dial to zero without turning the whole weight, then rotate the counterweight to the cartridge maker's recommended tracking force.
A beginner mistake here is guessing. If the cartridge calls for 2.0 grams and you run far below that, the stylus can mistrack and skip. Too high, and you add unnecessary wear. On a Fluance RT82 or RT85, this step matters. On a fully automatic model like the AT-LP60X-BK, the factory handles it for you.
What does anti-skate do on a turntable?
Anti-skate applies a small outward force to counter the tonearm's natural pull toward the center of the record. That helps the stylus track more evenly in both groove walls.
In practice, it can reduce channel imbalance, distortion, and uneven stylus wear. A simple starting point is to match anti-skate to tracking force. So if you're tracking at 2.0 grams, start anti-skate around 2. It's not magic, but it is one of those small settings that keeps a manual setup behaving properly.
Can you use a record player with Bluetooth speakers?
Yes, if the turntable has Bluetooth output or if you add a Bluetooth transmitter to the chain. But wired is still the smarter first test.
Bluetooth adds convenience and one more place for setup confusion. Pairing issues, latency, and volume mismatches can make you think the table is broken when the wireless link is the real problem. If you're shopping this route, read Bluetooth turntables explained and make sure the turntable also supports a normal wired connection.
Where should you place a record player for the best sound?
Put it on a stable, level surface away from foot traffic, subwoofers, and direct speaker vibration. Don't place the turntable on the same flimsy shelf as speakers if you can avoid it.
A small apartment setup makes this obvious fast. If the speakers sit inches from the platter on a hollow console, bass can feed back into the stylus and make the sound muddy or boomy. A sturdy stand or wall shelf usually does more for clean playback than a flashy accessory ever will.
How do you set up a record player for beginners?
Start with the simplest signal chain you can support. That usually means a turntable with a built-in phono preamp and a pair of powered speakers.
Then follow the basics in order: level the table, install the platter and belt if needed, remove transport locks and stylus guard, connect the RCA cables, set the preamp switch correctly, and test with a wired source first. If your model has a manual tonearm, set tracking force and anti-skate before playing records. Beginners don't need a complicated stack. They need a clean first spin.
Do record players need speakers?
Yes, unless the unit has built-in speakers. A turntable by itself doesn't make room-filling sound.
Most buyers are better off skipping weak built-in speakers and pairing a proper deck with powered speakers. You'll get better sound and a cleaner upgrade path. If you're comparing options, our speaker picks at speakers for turntables are the next stop.
Do I need a preamp for my turntable?
Maybe. You need one somewhere in the chain, but not always as a separate box.
If your turntable has a built-in phono preamp, you're covered. If your receiver has a phono input, you're covered there too. If you have neither, buy an external phono preamp. That's why beginners often do best with a switchable built-in setup. It keeps the first system simple and leaves room to upgrade later.
How do I connect a turntable to powered speakers?
If the turntable has a built-in phono preamp, set it to Line and run RCA cables straight into the powered speakers. If the speakers only accept 3.5mm input, use the proper adapter.
If the turntable doesn't have a built-in preamp, add an external phono preamp between the table and the speakers. One common mistake is leaving the turntable on Phono and plugging it straight into powered speakers. The result is usually very low, thin sound. The fix is often just flipping that switch to Line.
How do I balance a tonearm on a record player?
Start with the stylus protected and the cue lever down. Turn the counterweight until the tonearm floats level. That floating point is your neutral balance.
From there, set the tracking-force ring to zero, then dial in the recommended force by turning the counterweight. This is easiest on manual decks with visible counterweights, like many Fluance, Pro-Ject, and Rega models. If your table doesn't have an adjustable counterweight, the manufacturer has likely preset it.
What is anti-skate on a turntable?
Anti-skate is the control that helps keep the tonearm from pulling too hard toward the center of the record. It supports even tracking across the groove.
If it's set wildly wrong, you may hear distortion in one channel or notice uneven wear over time. For most beginner setups, matching anti-skate to tracking force is a solid starting point. Fine-tuning can come later, after you've confirmed the rest of the setup is right.
Can I connect a record player to Bluetooth speakers?
Yes, but the clean answer is this: only if the record player supports Bluetooth output, or if you add a transmitter after the preamp stage.
For first-time setup, don't make Bluetooth your only path. Test the turntable over RCA first. That way, if there's no sound, you know whether you're dealing with the table, the preamp, the speakers, or the wireless pairing. Convenience is nice, but wired is easier to troubleshoot.
Why is my record player humming after setup?
Hum usually comes from one of four things: a missing ground wire, loose RCA connections, bad cable routing near power cords, or a mismatch in the phono preamp path.
Here's a standing-in-front-of-the-rack fix list: make sure the ground wire is attached if your turntable requires one, reseat both RCA plugs, move signal cables away from power bricks, and confirm you aren't running a built-in preamp into a receiver's phono input. That last mistake is common and can make a good setup sound broken.
What is the best record player setup with speakers?
For most people, it's a turntable with a built-in phono preamp plus powered speakers. That setup is compact, easy to wire, and beginner-friendly.
If you want better long-term flexibility and already own a receiver, a turntable into a phono input plus passive speakers can sound excellent. But for a first apartment, dorm, or office system, powered speakers usually win on simplicity. The best setup is the one you can connect correctly in 20 minutes and enjoy all week.
What is the best turntable setup diagram?
The best diagram is the one that matches your actual gear. There are two common paths.
Path one: turntable with built-in preamp to powered speakers. Path two: turntable to phono preamp to receiver to passive speakers. If your receiver has a phono input, the external preamp drops out and the turntable goes straight to the receiver. Buyers get in trouble when they follow the wrong diagram for the gear on hand.
What is the best how to connect turntable to receiver?
Use the receiver input that matches the turntable's output mode. If the turntable is set to Phono and the receiver has a Phono input, connect there. If the turntable is set to Line because it uses its built-in preamp, connect to any standard line input like AUX, CD, or Line In.
Don't stack two phono stages by accident. A common example is an AT-LP70XBT set to Line, plugged into a receiver's Phono input. That can sound overloaded and harsh. Match one phono stage, not two.
What is the best record player setup for beginners?
The cleanest beginner turntable setup is a built-in-preamp model paired with powered speakers. That's why decks like the Audio-Technica AT-LP60X-BK and Audio-Technica AT-LP70XBT make sense for first-time buyers.
You avoid the extra receiver, keep cable routing simple, and reduce the odds of no-sound or hum issues. If you want a shortlist of beginner-friendly decks, start with turntables and compare that against your speaker plan before you buy.
What is the best do I need a phono preamp?
The best short answer is this: you need a phono preamp only if there isn't already one in your turntable, powered speakers, amplifier, or receiver.
For a first setup, a built-in preamp is usually worth it because it removes one box and one failure point. An external preamp can be better later if you're upgrading the rest of your system. But day one is about getting the signal chain right, not collecting extra components.
What is the best best speakers for turntable setup?
For most first systems, the best speakers are powered bookshelf speakers. They keep the setup simple because the amplifier is already inside.
Passive speakers make more sense if you already own a receiver or want to build a larger stereo over time. If you're starting from zero, powered speakers are usually the better buy. They save space, reduce wiring, and get you listening faster. For current picks, head to speakers for turntables.
What is the best how to set tracking force on turntable?
The best way is to follow the cartridge manufacturer's recommended range, not guess by feel. Balance the tonearm first, then dial in the correct tracking force with the counterweight. If you want extra accuracy, use a digital stylus force gauge.
This isn't just audiophile fussing. Too little force can cause mistracking and record wear. Too much can dull the sound and stress the stylus. On manual decks, this is one of the few setup steps that directly affects both sound and record safety.
What is the best turntable setup no sound?
Start with the obvious chain checks in order. Confirm the speakers are powered on, the correct input is selected, the RCA cables are fully seated, and the turntable's Line/Phono switch matches the system.
Then check whether you're using powered speakers or passive speakers. If they're passive, make sure a receiver or amp is in the chain. If the stylus guard is still on, remove it. If Bluetooth is involved, test wired first. No-sound problems usually come from one missed connection, not a dead turntable.
What is the easiest record player to set up for a beginner?
The Audio-Technica AT-LP60X-BK is one of the easiest. It's fully automatic, includes a built-in phono preamp, and doesn't ask you to balance a tonearm or set anti-skate.
The Audio-Technica AT-LP70XBT is another strong pick if you want similar ease with a little more flexibility. Both work well with powered speakers and keep the first setup low-friction. If you're shopping on a tighter budget, you can also browse turntables under $100 dollars, but be selective.
Do I need to buy speakers separately for my record player?
Usually, yes. Most proper turntables don't include speakers, and that's a good thing. Built-in speakers are convenient, but they rarely sound satisfying for long.
If you don't already own a receiver and passive speakers, buy powered speakers separately. That's the most common beginner path because it keeps the system small and simple. Think of it as buying the missing half of the setup, not an optional extra.
How much should I spend on a first record player setup?
A sensible first setup often lands between about $250 and $600, depending on whether you already own speakers. That range can get you a decent turntable, powered speakers, and a few basics like a brush and stable stand.
If your budget is tight, spend more on the turntable than on flashy extras. A solid entry-level Audio-Technica with modest powered speakers will usually beat a cheap all-in-one player with weak built-in sound. Budget shoppers should compare options at turntables under $100 dollars and then price speakers separately.
Is a built-in phono preamp worth it for a first setup?
Yes, for most beginners it is. A built-in phono preamp simplifies the signal chain and cuts down on setup mistakes.
That doesn't mean external preamps are pointless. It just means they make more sense once the rest of your system is strong enough to justify the extra box. For a first apartment or bedroom setup, a switchable built-in stage is the sweet spot. You get easy setup now and room to change the chain later.
Should I buy powered speakers or a receiver and passive speakers?
If you're starting from scratch, buy powered speakers. They're easier to set up, take less space, and cost less upfront because the amp is built in.
Choose a receiver and passive speakers if you want more inputs, more upgrade room, or already own part of the system. Here's the plain truth: powered speakers are usually the better first answer. Passive speakers are often the better long-term hobby answer. Buy for the setup path you can actually support right now.
Which beginner turntables are easiest to upgrade later?
The Fluance RT82 is one of the best beginner-friendly upgrade platforms because it gives you a stronger base and leaves room to improve the cartridge, preamp, and speakers over time. The Fluance RT85 goes further, but it asks more of you on setup and budget.
The Audio-Technica AT-LP70XBT also makes sense if you want easy day-one use with some flexibility later. If your goal is a simple start and a cleaner future path, avoid dead-end all-in-one players and look for switchable output, a replaceable stylus, and standard RCA connections.
After the common questions, the final recommendation pulls the whole setup decision into one simple shortlist.
Final Recommendation
The best pick for most people is the Audio-Technica AT-LP70XBT. It hits the sweet spot between easy setup, broad compatibility, and enough flexibility to grow with better speakers later. If you want the setup path that causes the fewest headaches on day one, this is the one to beat. Check the Price on Amazon!
The Audio-Technica AT-LP60X-BK is still the budget winner. It's the low-friction choice for first-time buyers who want a table that works with powered speakers and doesn't ask them to learn tonearm setup before dinner. If your goal is simple, wired playback without a pile of extra gear, it earns its place. Check the Price on Amazon!
For buyers ready to spend more and learn more, the Fluance RT85 is the premium recommendation. It rewards careful setup with a better long-term system foundation, but it isn't the best first choice if you want plug-and-play convenience above all else. Check the Price on Amazon!
The Fluance RT82 is the value pick. It gives you more upgrade room than the cheapest automatic decks without pushing you all the way into premium pricing. If you want a manual turntable that can anchor a better system over time, this is the smart middle lane. Check the Price on Amazon!
Here's the myth worth killing: a more complicated setup isn't always the better setup. A beginner with no receiver, limited space, and a modest budget doesn't need a tower of boxes. They need a turntable with a built-in phono preamp, a pair of powered speakers, and a stable shelf. That's how you spend more time with records and less time chasing hum.
If you're still deciding where to put your money, start with the signal chain. Then test wired first. Don't let Bluetooth, retro styling, or upgrade talk distract you from the basics that make a turntable actually work.
For most first systems, the smartest path is still this: built-in-preamp turntable plus powered speakers. If you need speaker ideas, head to speakers for turntables. If you're comparing decks by budget, browse turntables, turntables under $100 dollars, or turntables under $1000. And once you're up and running, protect the records you just bought with the basics at how to protect your records.
First-setup shopping checklist
You don't need much, but you do need the right pieces:
- Turntable
- Speakers
- RCA cable if not included
- Ground wire if required
- Stable stand or shelf
- Record brush
If you're buying your first system today, keep the shortlist tight: AT-LP70XBT for best overall, AT-LP60X-BK for budget, RT85 for premium, RT82 for value. Then match the table to the setup you can actually support on day one, not the fantasy rig you might build two years from now.